Showing posts with label VSphere 5. Show all posts

2/24/12

Passed VCP 510 (VMWare Certified Professional)

I recently passed the VCP 510 exam renewing my VCP again before the deadline of February 28th 2012. If I wouldnt have taken the exam before this date I would have had to enroll in the week long training class prior to taking the exam.

The exam was very much like what I have been used to as far as the previous VMWare VCP exams have been, it did seem like there were more select multiple answer type questions than usual.

Here is a great study site that currently has 927 test questions posted, I can say that these questions are right inline with what you can expect to see on the test. If you can get comfortable with these test questions you will surely pass the test with no issues.

Check out the test questions here

11/9/11

VMWare vCloud Director - Installation and Configuration Part 3


This is part 3 and the final part in a three part blog post, in this first post I'll briefly describe the process of configuring the vCloud Director application. I will also try and describe why vCloud Director is a useful application and what it brings to a development lab.

  1. vCloud Director - Configuration
  2. The Why - Why Clouds, what are the benefits?

vCloud Director Configuration


I won't cover the initial configuration step by step as there are many tutorials already available for establishing the initial vCloud Director configuration. I will point out the important things that will hopefully assist in successfully understanding and configuring your environment.


Steps - perform the following steps from the vDC home tab quick start menu
  1. Attach a vCenter server, the first step is to attach a vCenter server to the vCloud Director environment. The vCenter server must be in an available automated DRS configured cluster with an available resource pool. Note: for each vCenter server that you add to the vCloud Director environment you will first need a vShield Manager server configured and available.
    1. From the vDC home page select step 1 attach a vCenter
    2. Select the correct vCenter server to add to the vDC environment
  2. Create a Provider vDC - a Provider vDC combines the compute and memory resources of a single vCenter server resource pool with the storage resources of one or more datastores connected to that resource pool. A Provider vDC is the source for Organization vDCs (Org vDCs)
    1. From the vDC home page select step 2 create provider vDC
    2. Provide a Name
    3. Select a vCenter and Resource Pool
    4. Add Datastores
    5. Prepare the ESX(i) hosts
    6. Navigate to the Management Monitor tab and verify the ESX(i) hosts were prepared successfully, if you see a red x next to a host an error must have occurred. Note: I had an issue on both of my ESXi hosts where the preparation process was failing, it also affected HA on my vCenter cluster as this configuration would fail and pop an error stating the agent could not be installed. I ended up having to re-run the ESXi install to fix the issue on both hosts, and once HA would configure successfully then the vCloud host prepare finished successfully
    7. Once the Provider vDC has been created it should appear under the selected resource pool in the selected vCenter interface
    8.  
  3. Create external provider networks - a logically separated network based on a vSphere port group. It is the network created by the service provider to allow virtual machines and organizations to access the outside world (Internet). If you want your Organization (and also your vApps) to have connectivity to the external world you need to have External Networks. 
    1. From the vDC home page select step 3 create external network
    2. Choose a vCenter server
    3. Add the network mask, default gateway, DNS information and ip range
    4. Enter a name for the external network
    5. The provider is automatically added to the Provider vDC
  4. Create a network pool - a group of networks that is available for use within an Org vCD to create vApp networks and certain types of organization networks. A network pool is backed by vSphere network resources such as vlan ids, port groups, or cloud isolated networks. vCD uses network pools to create NAT routed and internal organization networks and all vApp networks. Network traffic on each network in a pool is isolated at layer 2 from all other networks. Each Org vCD can have one network pool, multiple Org vCDs can share the same network pool. The network pool for an Org vDC provides the networks created to satisfy the network quota for an Org vDC. There are three different kinds of network pools available within vCD and they are VLAN backed network pools, vCD isolation backed network pools and vSphere port group backed network pools.
    1. From the vDC home page select step 4 create a network pool
    2. Select a Network Pool Type
    3. Select vCenter Server
    4. Configure Pool
    5. Provide a name for the pool
  5. Create an Organization - Organizations provide resources to a group of users and set policies that determine how users can consume those resources. An organization is the fundamental vCD grouping that contains users the vApps that they create and the resources that the vApps use. It is a top level container in a cloud that contains one or more organization virtual datacenters (Org vDC's) and catalog entities.
    1. From the vDC home page select step 5 create and organization
    2. Provide a name
    3. Specify LDAP Settings (if desired) or create local users
    4. Specify if organization can publish its catalogs to other organizations
    5. Configure SMTP if email notifications are desired
    6. Specify leases and quotas (if desired)
    7. Create the Org vDC and specify which Provider vDC it is going to get its resources from
    8. Select an allocation model - example pay as you go
      1. Configure settings for model selected
      2. Specify how much storage is allocated (if desired)
      3. Specify which network pools the Org vDC is connected to
      4. Provide a name and description for Org vDC
  6. Catalog - a container for the following entities vApp templates, vApps, media images (floppy, ISO). Organizations will have their own catalog which they can populate and share with other organizations and users. 
    1. From the vDC home page select step 8 which is add a catalog to an organization
    2. Select the organization to add the catalog too
    3. provide a name for the catalog

The Why - Why Clouds? What are the benefits and why should I care?

"Cloud is all about giving the end-users an unprecedented level of flexibility that allows them to do things that were only available to vSphere administrators before. In a way you can think of vCloud Director as an interface (or a proxy) into the virtual infrastructure. This allows vSphere administrators to give end-users a lot more flexibility, but at the very same time it allows them to keep full control of what end-users can do"


The Virtual DataCenter - much like when you walk into a physical datacenter you will find some resources that you want to connect your virtual machines too. For example you will find network sockets, power sockets, storage resources that you can put your virtual machines on, you might find one or two sockets that state this socket goes to the internet.  Users are now empowered to provision vApps and workloads without having to talk to the IT administrator or the system administrator. They don't have to worry about connecting something to the wrong network or doing something that would require the IT administrator. Its all about Self Service

I'm still trying to understand and wrap my head around the whole vCloud infrastructure and how it changes a typical vSphere environment. vCloud Director provides another layer of abstraction to your environment, it reminds me of what vCenter did to my two ESX(i) hosts. Only vCD does this to vCenter.

What will vCD do to my existing infrastructure? You will go through a process where you surrender some of the resources of the infrastructure to the vCD at which point it will take over those resources and manage them but it will not touch any of the resources that you have left aside. 

I think my next post will be about configuring vCD networking

11/8/11

VMWare vCloud Director - Installation and Configuration Part 2


In this part we will install vShield Manager, create SSL certificates for vCloud Director and install the CENTOS Linux operating system which will host the vCloud Director software. vCloud Director requires a Linux operating system and cannot be installed on Microsoft Windows operating systems.
  1. vShield Manager - Download, deploy and configure
  2. SSL Certificates - Download Java Development Kit, generate certificates
  3. CENTOS - Download, install and configure 
  4. vCloud Director - Download install and configure

vShield Manager - Download and deploy the vShield Manager virtual appliance from vmware.com vShield Download

Note: for each vCenter server that you add to the vCloud Director environment you will first need a vShield Manager server configured and available.

Deploy the vShield Manager appliance, from vCenter select File | Deploy OVF Template, browse to the VMware-vShield-Manager-5.0.0-473791.ova file downloaded from vmware.com


After the vShield Manager is deployed, power on the virtual appliance. You will be prompted to login, the username is: admin and the password is: default.


Type en or enable followed by the password default to enter privileged mode. Type setup and complete all of the networking information. Save the configuration and type exit to logout. You can log back into the console and type show interface to view the configuration.

This completes the vShield Manager installation/configuration

SSL Certificates - The SSL certificates can be installed using multiple methods, first the Java Developement Kit contains the keytool required to create the certificates. The JDK can be downloaded and installed on a separate machine and the certificates can be created prior to performing the vCloud Director installation. The second method is to use the vCloud Director machine to generate the certificates, this can be accomplished mid way through the software installation and will require a couple of extra steps.

Method 1

Download and install the Java Software Development Kit  - Download Java Development Kit


Create the certificates using the command line tool, note the directories listed below will vary depending on the version of the JDK that you download.

"C:\Program Files\Java\jdk1.7.0_01\bin\keytool.exe” -keystore certificates.ks -storetype JCEKS -storepass password -genkey -keyalg RSA -alias http
“C:\Program Files\Java\jdk1.7.0_01\bin\keytool.exe” -keystore certificates.ks -storetype JCEKS -storepass password -genkey -keyalg RSA -alias consoleproxy
“C:\Program Files\Java\jdk1.7.0_01\bin\keytool.exe” -storetype JCEKS -storepass password -keystore certificates.ks -list

Note: The certificates will be created and stored in a file named certificates.ks located in the C:\Program Files\Java\jdk1.7.0_01\bin directory (or alternate version directory). The certificates created in this example all have the password: password. Make sure to copy these files to a shared location, they will need to be copied to the CENTOS machine before the vCloud Director installation can be completed


CENTOS Installation / Configuration - I chose to download the latest CENTOS v 6.0 x64 version.

Create a new virtual machine


Provide a name for the virtual machine


Select an operating system for the new machine


Add one additional Network Interface Card for a total of 2 to the new virtual machine.

After the virtual machine has been created, attach the CD drive of the virtual machine to the ISO file (CentOS-6.0-x86_64-bin-DVD1.iso) downloaded from vmware.com


Make sure that during the installation of CENTOS you configure the two network adapters with 2 unique ip addresses on the same subnet.

Note: make sure that the network cards are configured to connect automatically and available to all users.


I chose web server from the available package group options during the installation, I also chose customize now and selected several of the available options. Unfortunately I don't know the CENTOS very well and I can't list which options to select to install the tools necessary to successfully build a host for vCloud Director so choose most of the available options. I did not include the ones that made no sense such as the main frame, san, databases, graphics, etc.

The important thing to include is the security package, without the firewall being installed and disabled, I was not able to remotely access the vCloud Director configuration page. 
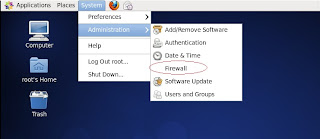


If after you complete the installation and you power on the virtual machine you see no firewall, you can manually add this be entering the following command at the command line.

yum install system-config-securitylevel

After the installation is complete and rebooted, log in to the machine as root. Open the firewall configuration by selecting System | Administration | Firewall and choose disable.

Map a network drive to the shared location where your certificates.ks file is located.

Open Computer and select File | Connect to Server


Copy the certificates.ks file to the CENTOS desktop, repeat these procedures for the vCloud Director software - vmware-vcloud-director-1.5.0-464915.bin file. Copy the vCloud Director sofware into the root's Home folder on the desktop.

Note: you must change the permissions on the vmware-vcloud-director-1.5.0-464915.bin file by right clicking on the file and selecting the permissions tab and check the Allow executing file as a program checkbox.


vCloud Director
Select Applications | System Tools | Terminal and enter ls -al at the command prompt, this will list all of the available files. type ./vmware-vcloud-director-1.5.0-464915.bin and press enter. This will begin the vCloud Director installation process.
The following prompts will be displayed
Run the installer - type “y”
If you chose Method 1 for creating the SSL certificates earlier in the tutorial, make sure you copy the certificates.ks file into the /opt/vmware/vcloud-director directory now and then you can come back to this prompt and answer "y" to the Run the configuration script and skip the certificates creation step, otherwise type “n”
Method 2 for creating SSL Certificates
Create self signed certificates, from the terminal window type the following commands:  
/opt/vmware/vcloud-director/jre/bin/keytool -keystore certificates.ks -storetype JCEKS -storepass password -genkey -keyalg RSA -alias http -dname “cn=vcloud, ou=vmware, o=vmware, c=US” -keypass password

/opt/vmware/vcloud-director/jre/bin/keytool -keystore certificates.ks -storetype JCEKS -storepass password -genkey -keyalg RSA -alias consoleproxy -dname “cn=vcloud, ou=vmware, o=vmware, c=US” -keypass password
A file named “certificates.ks” will be created in the root's Home folder, copy this file to the /opt/vmware/vcloud-director directory. If the file is located in this directory the installer will not need a path specified.
Continue the installation process by typing /opt/vmware/vcloud-director/bin/configure
  • Select your first IP address, this will be the IP address which is used for vCD web page or press enter to accept the default 
  • Select your second IP address, this will be the IP address which is used for the VM Remote Console or press enter to accept the default 
  • Because we copied the certificates.ks file into the vcloud-directory already just type certificates.ks 
  • Enter the password: password Press enter to skip the “syslog server”
  • Select Oracle or SQL Server 
  • Enter the machine name or IP address for the database server 
  • Press enter to use default database port (1521) Oracle or (1433) SQL 
  • Type the database name, press enter for default (vcloud) 
  • Type the database username 
  • Type the database password 
  • Now the database will be initialized and the vCD install will be completed 
  • Type “y” to start the vCD service


You can monitor the progress of the vCD service start up as follows 
type: tail -f /opt/vmware/cloud-director/log/cell.log

This is an important step to verify your installation has completed successfully.
It will show you the percentage of the initialization of the application that has completed. If everything installs correctly you will see a message “Application Initialization: Complete.
Note: I had a few failed attempts where the application initialization would hang, ussually around 18%. I found that if for whatever reason you have to run the installation again, you must delete the old database from your database server before you re-run the install.
I also had to had to start over rebuilding the CENTOS and re-running the installation a couple of times before I figured out some of these gotchas. After the installation is complete, you should be able to launch a browser and enter the vCloud Director IP Address (the first one assigned) to access the vCloud Director configuration page.

This completes Part 2


11/6/11

VMWare vCloud Director - Installation and Configuration Part 1


This is part 1 in a multi-part blog post, in this first post I'll describe the process of laying the groundwork for what will eventually be a working vCloud Director / vShield Manager deployment in my VMWare VSphere lab.


Part 2 will be forthcoming
  1. Database Server - Guide for installing Oracle 11g or choose Microsoft SQL Server
  2. vShield Manager, SSL Certs, CENTOS and vCloud Director - Deploy and configure the vShield Manager virtual appliance. Generate SSL certificates necessary when installing vCloud Director. Create a Linux operating system to host vCloud Director. Install and configure vCloud Director.  
I decided to learn the process of installing and configuring VMWare's vCloud Director. I plan on installing this within my own lab infrastructure for testing and development/prototyping purposes.

The first thing I wanted to know before I decided to install vCD was

What will vCD do to my existing infrastructure? You will go through a process where you surrender some of the resources of the infrastructure to the vCD at which point it will take over those resources and manage them but it will not touch any of the resources that you have left aside.


Required components for this installation.


Database Server - I decided to document the process of installing Oracle, if you want to use Microsoft SQL Server you can skip to part 2. I chose to use Oracle 11g, created an account on the Oracle website and downloaded the database sofware. I'll be installing the database software on an existing Windows 2003 Server R2 x64 bit virtual machine that I currently use to run my VCenter Server on. Oracle Download


vCloud Director - VMware vCloud Director enables customers to build secure, multitenant hybrid clouds by pooling infrastructure resources into virtual datacenters. and enabling those resources to be consumed by users on-demand. vCloud Director pools datacenter resources, including compute, storage and network, along with their relevant policies into virtual data centers. Fully encapsulated multitier virtual machine services are delivered as vApps, using the Open Virtualization Format (OVF). End users and their associated policies are captured in organizations. With programmatic and policy-based pooling of infrastructure, users and services, VMware vCloud Director enforces policy intelligently and creates unprecedented flexibility and portability. vCloud Download


vShield Manager - Included with all vShield products, vShield Manager provides a central point of control for managing, deploying, reporting, logging and integrating vShield as well as third-party security services. Working in conjunction with vCenter Server, vShield Manager enables role based access control and separation of duties as part of a unified framework for managing virtualization security. vShield Download


CENTOS - Linux operating system to install vCloud Director on - CENTOS Download

If you are planning on using Microsoft SQL Server skip to part 2.

Oracle installation - After downloading the two files that make up the Oracle 11g installation for Windows x64, extract the zip files and run the installation.

Follow the installation wizard and configure the install according to your requirements, the screenshots below show the configuration that I chose for my lab.


Note: The global database name used in the field below will be used to connect to the Oracle database after the installation is complete


After the Oracle Installation is complete, launch a command prompt and type: 
sqlplus system/oracle@localhost/[Global Database Name]
example:  sqlplus system/oracle@localhost/orcl.csharpsnippets.local

From the SQL> prompt type: create user cloud identified by oracle;

A message should appear: User created.


Now type the following command: grant "RESOURCE", "DBA", "CONNECT" to orcl;

You should see the message: Grant succeeded.


Verify the Oracle install and listener


This completes part 1 and the Oracle Installation. 

10/24/11

Synology Disk Station DS1010+ vs IOMEGA StorCenter IX4-200D

Disk Station DS1010+


Pros 
  • Award winning management interface
  • Flexible RAID volume formats (SHA, RAID+)
  • Performance
  • Dual GB Nics
  • VMWare Certified
  • iSCSI, NFS support
  • Expandability
  • Synology support
  • IPV6 Support
  • iPhone/iPad Apps
  • Link Aggregation for better performance
  • Memory : DDR2 1 GB (Expandable, up to 3GB)
Cons
  • Price
  • Power consumption (68 watt avg)
  • No integrated Synology Cloud functionality


I've been researching home/small business NAS units lately, and I can't seem to find a better bang for the buck than the Synology Disk Station DS1010+, they actually call this the DS1511+ now.

One thing that stands out on the Synology is the Disk Station Manager software which is currently at version 3.2 (only about a month old) and they have had an incredible number of revisions over the last several years.

Unique to Synology is the proprietary Hybrid RAID (SHR) which allows different physical disk sizes in the RAID volume to be combined and without losing any drive space. The SHR also allows for excellent RAID volume creation time, 8TB volume can take as little as 30 mins.


The DS1010+ is one of the top rated NAS devices in most performance comparisons that I've seen, I recommend searching for some benchmark comparisons like the one shown here.


Pros 
  • Dual GB Nics
  • VMWare Certified
  • iSCSI, NFS support
  • Cost
  • Low power consumption avg 30 watts
Cons
  • Iomega abandoned for other models
  • Performance
  • Dated interface
  • Unit reconstructs and verfies RAID array to often
  • No 3TB support
  • No Cloud functionality
  • No IPV6 Support
  • No iPhone/iPad Apps
  • Cannot expand memory (only 512mb)

I've blogged about the Iomega Storcenter IX4-200D NAS units that I have in my Lab, at the time of purchase I thought they were the best bang for the buck. The Iomegas have served me well and have handled all of the different network and storage configurations I have thrown at them but I honestly don't trust them.

More than once on both units I have had the NAS start rebuilding the RAID 5 array for no apparent reason, sometimes after heavy use and sometimes after what seems like little or no use. The unit will sometime rebuild and sometimes say verifying the RAID array. The rebuild process can take around 40 hours to complete with 4 2TB Seagate Barracuda Low Power 5900RPM drives. The verification can take about 12 hours with no degraded performance during the process. When the RAID array is being reconstructed the performance is horrible during the entire 40 hour process, it's so slow that the VCenter service will not start (probably due to timeout) which causes a lot of headaches.


During one month I had the RAID array rebuild 3 times and finally on the third time it reported that a drive had failed and it could not rebuild. This made me think that this had been the problem all along, a drive was failing and causing the inconsistencies. I replaced the drive (I always have a spare on hand) and the NAS reconstructed the RAID array. A few weeks later the NAS started reverifying the array, I haven't had it rebuild since the drive replacement but I'm worried about all of this activity. A couple weeks later I get the other Iomega NAS reconstructing the RAID array.

Two of my co-workers have the same Iomega IX4-200D NAS and have reported the exact same behavior with their units. I often wonder if it is a result of the drives that are in the unit (the Seagate LP Barracudas) or some incompatibility with VMWare ESX(i). We are all using our NAS devices in a similar fashion.

The deal breaker for me with the Iomega NAS has been Iomega themselves, Iomega seems to have completely abandoned their customers who purchased these devices. Shortly after the IX4-200D released, Iomega released the IX4-200D Cloud Edition, to my surprise they didn't offer any of the new features to the original IX4-200d NAS owners. Since Iomega released the IX4-200d, they have only released four small updates to the management software and the last one was about a year ago. The Cloud edition received a brand new shiny interface and integrated cloud functionality on what appears to be the exact same hardware (same processor speed, ram amount) it also added support for 3TB drives. At a minimum I would expect Iomega to add the 3TB drive support to all of its products.

Since the Cloud edition was released Iomega has released an entire new line of home/small business NAS devices  - the px series.

Overall I am very dissatisfied with Iomega, I will not buy another Iomega product unless Iomega does something significant to improve upon this disaster they have created. I would not recommend Iomega devices to anyone who is looking for a company to stand behind and support the products they sell.