10/26/11

Sharepoint 2010 Service Pack 1 (SP1) improvements, fixes, updates


Overview of SharePoint Server 2010 SP1 improvements

  • Recycle bin: Lets you restore a site collection or a web that was deleted.
    • Service Pack 1 will introduce long awaited Site Recycle Bin functionality that enables self-service recovery of site collections and sites.   In the past IT Professionals were tasked with restoring entire databases to recover deleted site collections and sites and would generally require expensive restore environments to support the task.  Now in Service Pack 1 administrators can quickly and easily recover site collections and sites accidentally deleted by their owners in a process similar to that of the Recycle Bin we have for Lists, Libraries, and Documents.
  • Remote Backup Systems (RBS) and shallow copy can decrease downtime and increase efficiency by moving pointers to databases instead of moving databases.
    • If you’re using Remote BLOB Storage you’ve probably realized that when moving Site Collections (Move-SPSite) between content databases each unit of unstructured data (BLOB) was round tripped (I.e. uploaded and subsequently downloaded again) serially during the move.  This operation was both time consuming and resource intensive.  In Service Pack 1 we reduce that overhead by enabling “shallow copy” when moving Site Collections between databases where Remote BLOB Storage is used.  New Shallow Copy functionality with the Move-SPSite CmdLet enables moving site collections between content databases without moving the underlying unstructured data, i.e. Microsoft Word documents, PowerPoint Presentations, etc. significantly increasing performance and reliability for organizations using Remote BLOB Storage by simply updating the pointers to those objects in the destination content database.
  • You can see which folders are taking up valuable space with the improved Storage Management feature in site settings.
    • In SharePoint 2010 we removed StorMan.aspx (Storage Space Allocation) (see http://support.microsoft.com/kb/982587/EN-US) which in previous versions of SharePoint enabled granular management and insight into storage.  For example, the page would show you the top 100 documents or document libraries in terms of size.  With that information end users could the page to clean up content from their site(s) by deleting the large content that they no longer needed.  In Service Pack 1 we are bringing back an improved StorMan.aspx, enabling users to better understand where their quota is going and act upon that information to reduce the size of their sites.
  • Support for Microsoft SQL Server 2011.
  • A more robust Search Host Distribution service that improves error recovery and performance during the search crawl.
  • Adds backup and restore functionality to recover deleted site collections and webs.
  • Cascading filters in PerformancePoint Services: Filters values can now be passed from one filter to the next.
  • Support for Google Chrome - Very excited about this one!
  • Improved support for Internet Explorer 9.
  • Project Professional now synchronizes scheduled tasks with SharePoint task lists
The recommended order of installation is as follows:

You can then run the Configuration Wizard (PSConfig) one time on all boxes.

New Sharepoint Powershell Cmdlets


  • Add-SPProfileLeader -  Add a user as the company leader, make sure the CEOs pages are top in the search results, note: requires a full crawl be performed before results are seen.

  • Get-SPProfileLeader - Displays the company leader

  • Remove-SPProfileLeader - Removes the company leader

  • Remove-SPProfileSyncConnection - Make it easier to manage sync connections, link between the User Profile Synchronization Service (UPS) and the connected directory services

  • Add-SPProfileSyncConnection - Make it easier to manage sync connections


  • Disable-SPHealthAnalysisRule - Disables health analyzer rules 

  • Enable-SPHealthAnalysisRule - Enables health analyzer rules

  • Get-SPHealthAnalysisRule - Displays a health analyzer rule

  • Get-SPDeletedSite - Use this cmdlet to display a list of deleted site collections by using the identity parameter, if no parameter is specified then all deleted site collections in the farm are displayed

  • Remove-SPDeletedSite - Use this cmdlet to permanently remove a deleted site collection from the farm

  • Restore-SPDeletedSite - Restore a previously deleted site collection

  • Move-SPSocialComments - Move social comments from one page to another


  • Download Links for 2010 Service Pack 1

    Access 2010 Runtime SP1
    Access Database Engine 2010 SP1
    FAST Search Server 2010 for SharePoint SP1
     
    Groove Server 2010 SP1
     
    Office 2010 Filter Pack SP1
    Office 2010 Language Pack SP1
    Office 2010 SP1
    Office Language Interface Pack 2010 SP1
    Office Proofing Tools 2010 SP1
    Office Web Apps 2010 SP1
     
    PowerPoint Viewer SP1
     
    Project 2010 SP1
    Project Server 2010 SP1
     
    Search Server 2010 SP1
     
    Server Language Pack SP1
     
    SharePoint 2010 Indexing Connector for Documentum SP1
     
    SharePoint Designer 2010 SP1
    SharePoint Foundation 2010 Client Object Model Redistributable SP1
    SharePoint Foundation 2010 Language Pack SP1
     
    SharePoint Foundation 2010 SP1
     
    SharePoint Server 2010 SP1
    Visio 2010 SP1
    Visio Viewer 2010 SP1

    Inside Apple iTunes, Sharing music on your home network


    I've been trying (and still am) to figure out the best way to manage and share a large library of .mp3 files, I never cared much for iTunes but considering I have iPhone/iPads I thought I should at least look into it.

    The sharing features of iTunes leave much to be desired but I am going to attempt to configure it so that I have an iTunes server with a library that can be shared throughout my network.

    What I decided to do was to install iTunes on a virtual machine running in my VMWare ESXi environment, this way I could add iTunes into the startup folder and it would always be open and available. One of the things I don't like about iTunes is that to share a library iTunes has to be open and if you setup sharing and want to add or edit music or playlists, you have to do it from one computer.

    So I wanted to come up with a way where any one of the computers could add or edit music or playlists and it would propagate to all the other iTunes computers in the house.

    First on the iTunes server I pointed the media folder to my network share that contains all of my .mp3 files, I also checked the copy files to iTunes Media folder when adding to library checkbox. This way any new music added to the library will be copied into a central location.


    Import Music

    To import my music I selected File - Add Folder and proceeded to browse to my mapped drive where all my .mp3 files are located. Note this can be a very slow process if you have several GB of music.


    Once all the music has been added to the library, I'm ready to look at how iTunes keeps track of the library and what files are important to know about.

    iTunes Library Files - Library.itl and Library.xml


    The iTunes library is a database iTunes uses to organize your music. Two iTunes library files are created and maintained by iTunes for different purposes. They're both in the iTunes folder.

    Location of the iTunes library files:


    Mac OS X:
    /Users/username/Music/iTunes/iTunes Library.itl
    /Users/username/Music/iTunes/iTunes Library.xml


    Windows XP
    \Documents and Settings\username\My Documents\My Music\iTunes\iTunes Library.itl 
    \Documents and Settings\username\My Documents\My Music\iTunes\iTunes Library.xml


    Windows Vista
    \Users\username\Music\iTunes\iTunes Library.itl 
    \Users\username\Music\iTunes\iTunes Library.xml


    Windows 7
    \Users\username\My Music\iTunes\iTunes Library.itl
    \Users\username\My Music\iTunes\iTunes Library.xml


    About the iTunes Library.itl file
    This file is a database of the songs in your library and the playlists you've created. Some song-specific data is saved in this file. If you delete the file, iTunes creates a new, empty copy when you open the application, but any playlists, song ratings, comments, or other information you created is lost. The iTunes Library file is only used by iTunes, and is the only one backed up by Time Machine on OS X.


    About the iTunes Library.xml file
    This file contains some (but not all) of the same information stored in the iTunes Library file. The purpose of the iTunes Library.xml file is to make your music and playlists available to other applications on your computer. In Mac OS X other iLife applications (like iPhoto, iDVD, and iMovie) use this file to make it easier for you to add music from your iTunes library to your projects.


    The point of this tutorial is to let several computers share the same iTunes library so after all of my music has been successfully added to my iTunes server I need to share the library files on the server. On the iTunes server, I navigated to the folder containing the iTunes library metadata. By default (see locations above) you can typically find this in \Users\username\My Music\iTunes. I see a file called iTunes Library.itl so I know I'm in the right location. I need to share this folder on the network, so I right-click the iTunes folder, select Sharing and security and select Share. Now I add the users that I would like to give share access and select the share button.


    Grant permissions to all user accounts that will need access to the iTunes library


    Next I connected all of my networked computers to the iTunes share, I mapped a drive on each. To do this, access a networked Windows computer, right-click on My Computer, and select "Map network drive" Choose a drive letter, then I browse to the share I created on the iTunes server. When I'm done, I click Finish. 


    Now on all of my networked computers, I launch iTunes while holding the Shift key. This let me change the default iTunes library. I Clicked on Choose library, then navigated to the mapped drive (W:) that I just created. Select the iTunes Library.itl file and I'm done.


    This completes the shared iTunes library, I'll continue to test how this works and if I find any improvements I'll update the post.


    10/24/11

    Synology Disk Station DS1010+ vs IOMEGA StorCenter IX4-200D

    Disk Station DS1010+


    Pros 
    • Award winning management interface
    • Flexible RAID volume formats (SHA, RAID+)
    • Performance
    • Dual GB Nics
    • VMWare Certified
    • iSCSI, NFS support
    • Expandability
    • Synology support
    • IPV6 Support
    • iPhone/iPad Apps
    • Link Aggregation for better performance
    • Memory : DDR2 1 GB (Expandable, up to 3GB)
    Cons
    • Price
    • Power consumption (68 watt avg)
    • No integrated Synology Cloud functionality


    I've been researching home/small business NAS units lately, and I can't seem to find a better bang for the buck than the Synology Disk Station DS1010+, they actually call this the DS1511+ now.

    One thing that stands out on the Synology is the Disk Station Manager software which is currently at version 3.2 (only about a month old) and they have had an incredible number of revisions over the last several years.

    Unique to Synology is the proprietary Hybrid RAID (SHR) which allows different physical disk sizes in the RAID volume to be combined and without losing any drive space. The SHR also allows for excellent RAID volume creation time, 8TB volume can take as little as 30 mins.


    The DS1010+ is one of the top rated NAS devices in most performance comparisons that I've seen, I recommend searching for some benchmark comparisons like the one shown here.


    Pros 
    • Dual GB Nics
    • VMWare Certified
    • iSCSI, NFS support
    • Cost
    • Low power consumption avg 30 watts
    Cons
    • Iomega abandoned for other models
    • Performance
    • Dated interface
    • Unit reconstructs and verfies RAID array to often
    • No 3TB support
    • No Cloud functionality
    • No IPV6 Support
    • No iPhone/iPad Apps
    • Cannot expand memory (only 512mb)

    I've blogged about the Iomega Storcenter IX4-200D NAS units that I have in my Lab, at the time of purchase I thought they were the best bang for the buck. The Iomegas have served me well and have handled all of the different network and storage configurations I have thrown at them but I honestly don't trust them.

    More than once on both units I have had the NAS start rebuilding the RAID 5 array for no apparent reason, sometimes after heavy use and sometimes after what seems like little or no use. The unit will sometime rebuild and sometimes say verifying the RAID array. The rebuild process can take around 40 hours to complete with 4 2TB Seagate Barracuda Low Power 5900RPM drives. The verification can take about 12 hours with no degraded performance during the process. When the RAID array is being reconstructed the performance is horrible during the entire 40 hour process, it's so slow that the VCenter service will not start (probably due to timeout) which causes a lot of headaches.


    During one month I had the RAID array rebuild 3 times and finally on the third time it reported that a drive had failed and it could not rebuild. This made me think that this had been the problem all along, a drive was failing and causing the inconsistencies. I replaced the drive (I always have a spare on hand) and the NAS reconstructed the RAID array. A few weeks later the NAS started reverifying the array, I haven't had it rebuild since the drive replacement but I'm worried about all of this activity. A couple weeks later I get the other Iomega NAS reconstructing the RAID array.

    Two of my co-workers have the same Iomega IX4-200D NAS and have reported the exact same behavior with their units. I often wonder if it is a result of the drives that are in the unit (the Seagate LP Barracudas) or some incompatibility with VMWare ESX(i). We are all using our NAS devices in a similar fashion.

    The deal breaker for me with the Iomega NAS has been Iomega themselves, Iomega seems to have completely abandoned their customers who purchased these devices. Shortly after the IX4-200D released, Iomega released the IX4-200D Cloud Edition, to my surprise they didn't offer any of the new features to the original IX4-200d NAS owners. Since Iomega released the IX4-200d, they have only released four small updates to the management software and the last one was about a year ago. The Cloud edition received a brand new shiny interface and integrated cloud functionality on what appears to be the exact same hardware (same processor speed, ram amount) it also added support for 3TB drives. At a minimum I would expect Iomega to add the 3TB drive support to all of its products.

    Since the Cloud edition was released Iomega has released an entire new line of home/small business NAS devices  - the px series.

    Overall I am very dissatisfied with Iomega, I will not buy another Iomega product unless Iomega does something significant to improve upon this disaster they have created. I would not recommend Iomega devices to anyone who is looking for a company to stand behind and support the products they sell.

    10/23/11

    Backup your VMWare ESX(i) Virtual Machines with Veeam for free! (VCPs)


    I have been seeing posts about Veeam in blog sites and tech articles lately which peaked my interest to look into the Veeam line of products. I asked a co-worker about Veeam and he informed me that Veeam is currently free for all VMWare Certified Professionals (VCP).

    From the following link you can register and download the software and license keys for both Veam Backup and Replication as well as Veeam Backup Enterprise Manager.

    http://www.veeam.com/nfr/free-nfr-license

    I installed Veeam Backup and Replication in a Windows Server 2008R2 virtual machine, and proceeded to configure some backups jobs. If you want to install Veeam Backup Enterprise Manager - IIS  must be installed on the machine prior to installation, including IIS 6 compatibility and Windows Integrated Authentication.

    For the purposes of this demonstration I selected Add Server and pointed to a single ESXi Host

    Enter the Host Name or IP Address followed by the login information


    After the host is connected, the Datastores connected to the host will be displayed beneath the Host Name


    Once an ESX(i) host has been connected, a backup job can be configured. Start by selecting Backup from the top navigation


    Enter a name for the new backup job


    Select a Processing Mode, for this demonstration I have selected Network


    Select the Virtual Machine(s) that will be included in the backup job


    Browse for Virtual Machines


    The size of the Virtual Machine(s) will be displayed


    From this step hard drives and templates can be excluded from the backup job. Select Exclusions


    Select the Disks Tab and the Virtual Machine and Choose Edit


    All Disks can be included or individual disks can be chosen, if individual disks are required, select the Selected Disks radio button followed by the virtual disks you want to exclude and select OK.


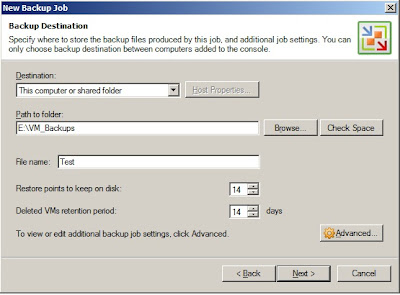
    Enter the Backup Destination settings


    Enter Guest Processing, if there are applications on the guest that could possibly need to be gracefully closed during the backup, select Enable application-aware image processing and enter the guest credentials with permissions to the machine


    The job can be scheduled or ran manually


    This completes the configuration of the domain controller backup job