In this part we will install vShield Manager, create SSL certificates for vCloud Director and install the CENTOS Linux operating system which will host the vCloud Director software. vCloud Director requires a Linux operating system and cannot be installed on Microsoft Windows operating systems.
- vShield Manager - Download, deploy and configure
- SSL Certificates - Download Java Development Kit, generate certificates
- CENTOS - Download, install and configure
- vCloud Director - Download install and configure
vShield Manager - Download and deploy the vShield Manager virtual appliance from vmware.com
vShield Download
Note: for each vCenter server that you add to the vCloud Director environment you will first need a vShield Manager server configured and available.
Deploy the vShield Manager appliance, from vCenter select File | Deploy OVF Template, browse to the VMware-vShield-Manager-5.0.0-473791.ova file downloaded from vmware.com
After the vShield Manager is deployed, power on the virtual appliance. You will be prompted to login, the username is: admin and the password is: default.
Type en or enable followed by the password default to enter privileged mode. Type setup and complete all of the networking information. Save the configuration and type exit to logout. You can log back into the console and type show interface to view the configuration.
This completes the vShield Manager installation/configuration
SSL Certificates - The SSL certificates can be installed using multiple methods, first the Java Developement Kit contains the keytool required to create the certificates. The JDK can be downloaded and installed on a separate machine and the certificates can be created prior to performing the vCloud Director installation. The second method is to use the vCloud Director machine to generate the certificates, this can be accomplished mid way through the software installation and will require a couple of extra steps.
Method 1
Create the certificates using the command line tool, note the directories listed below will vary depending on the version of the JDK that you download.
"C:\Program Files\Java\jdk1.7.0_01\bin\keytool.exe” -keystore certificates.ks -storetype JCEKS -storepass password -genkey -keyalg RSA -alias http
“C:\Program Files\Java\jdk1.7.0_01\bin\keytool.exe” -keystore certificates.ks -storetype JCEKS -storepass password -genkey -keyalg RSA -alias consoleproxy
“C:\Program Files\Java\jdk1.7.0_01\bin\keytool.exe” -storetype JCEKS -storepass password -keystore certificates.ks -list
Note: The certificates will be created and stored in a file named certificates.ks located in the C:\Program Files\Java\jdk1.7.0_01\bin directory (or alternate version directory). The certificates created in this example all have the password: password. Make sure to copy these files to a shared location, they will need to be copied to the CENTOS machine before the vCloud Director installation can be completed
CENTOS Installation / Configuration - I chose to download the latest CENTOS v 6.0 x64 version.
Create a new virtual machine
Provide a name for the virtual machine
Select an operating system for the new machine
Add one additional Network Interface Card for a total of 2 to the new virtual machine.
After the virtual machine has been created, attach the CD drive of the virtual machine to the ISO file (CentOS-6.0-x86_64-bin-DVD1.iso) downloaded from vmware.com
Make sure that during the installation of CENTOS you configure the two network adapters with 2 unique ip addresses on the same subnet.
Note: make sure that the network cards are configured to connect automatically and available to all users.
I chose web server from the available package group options during the installation, I also chose customize now and selected several of the available options. Unfortunately I don't know the CENTOS very well and I can't list which options to select to install the tools necessary to successfully build a host for vCloud Director so choose most of the available options. I did not include the ones that made no sense such as the main frame, san, databases, graphics, etc.
The important thing to include is the security package, without the firewall being installed and disabled, I was not able to remotely access the vCloud Director configuration page.
If after you complete the installation and you power on the virtual machine you see no firewall, you can manually add this be entering the following command at the command line.
yum install system-config-securitylevel
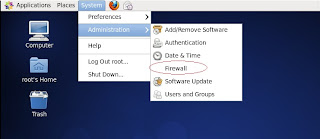
After the installation is complete and rebooted, log in to the machine as root. Open the firewall configuration by selecting System | Administration | Firewall and choose disable.
Map a network drive to the shared location where your certificates.ks file is located.
Open Computer and select File | Connect to Server
Copy the certificates.ks file to the CENTOS desktop, repeat these procedures for the vCloud Director software - vmware-vcloud-director-1.5.0-464915.bin file. Copy the vCloud Director sofware into the root's Home folder on the desktop.
Note: you must change the permissions on the vmware-vcloud-director-1.5.0-464915.bin file by right clicking on the file and selecting the permissions tab and check the Allow executing file as a program checkbox.
vCloud Director
Select Applications | System Tools | Terminal and enter ls -al at the command prompt, this will list all of the available files. type ./vmware-vcloud-director-1.5.0-464915.bin and press enter. This will begin the vCloud Director installation process.
The following prompts will be displayed
Run the installer - type “y”
If you chose Method 1 for creating the SSL certificates earlier in the tutorial, make sure you copy the certificates.ks file into the /opt/vmware/vcloud-director directory now and then you can come back to this prompt and answer "y" to the Run the configuration script and skip the certificates creation step, otherwise type “n”
Method 2 for creating SSL Certificates
Create self signed certificates, from the terminal window type the following commands:
/opt/vmware/vcloud-director/jre/bin/keytool -keystore certificates.ks -storetype JCEKS -storepass password -genkey -keyalg RSA -alias http -dname “cn=vcloud, ou=vmware, o=vmware, c=US” -keypass password
/opt/vmware/vcloud-director/jre/bin/keytool -keystore certificates.ks -storetype JCEKS -storepass password -genkey -keyalg RSA -alias consoleproxy -dname “cn=vcloud, ou=vmware, o=vmware, c=US” -keypass password
A file named “certificates.ks” will be created in the root's Home folder, copy this file to the /opt/vmware/vcloud-director directory. If the file is located in this directory the installer will not need a path specified.
Continue the installation process by typing /opt/vmware/vcloud-director/bin/configure
- Select your first IP address, this will be the IP address which is used for vCD web page or press enter to accept the default
- Select your second IP address, this will be the IP address which is used for the VM Remote Console or press enter to accept the default
- Because we copied the certificates.ks file into the vcloud-directory already just type certificates.ks
- Enter the password: password Press enter to skip the “syslog server”
- Select Oracle or SQL Server
- Enter the machine name or IP address for the database server
- Press enter to use default database port (1521) Oracle or (1433) SQL
- Type the database name, press enter for default (vcloud)
- Type the database username
- Type the database password
- Now the database will be initialized and the vCD install will be completed
- Type “y” to start the vCD service
You can monitor the progress of the vCD service start up as follows This is an important step to verify your installation has completed successfully.
It will show you the percentage of the initialization of the application that has completed. If everything installs correctly you will see a message “Application Initialization: Complete.
Note: I had a few failed attempts where the application initialization would hang, ussually around 18%. I found that if for whatever reason you have to run the installation again, you must delete the old database from your database server before you re-run the install.
I also had to had to start over rebuilding the CENTOS and re-running the installation a couple of times before I figured out some of these gotchas. After the installation is complete, you should be able to launch a browser and enter the vCloud Director IP Address (the first one assigned) to access the vCloud Director configuration page.
This completes Part 2


