In this blog post I'll demonstrate how to create a SharePoint Online Hosted Add-In that uses the SharePoint REST API to interact with a custom SharePoint list to Create, Read, Update and Delete records from this list in a responsive fashion.
The project contains a custom SharePoint List called Files that will be populated using sample data, this list will provide the data to the JQuery datatables grid.
Prerequisites
- Office 365 Tenant
- Visual Studio 2015 or Visual Studio Code
- SPFastDeploy (optional) - if you haven't used this tool before please take a look at my blog post on this Here
Javascript Libraries
Install the following Javascript libraries via NuGet
- Bootstrap v3.3.7 (Don't install v4+ for this demo)
- Bootstrap.dialog
JQuery (installed by default)- Jquery Datatables
Jquery Datatables.select (Installed with JQuery Datatables NuGet package)- Toastr
Download Visual Studio Solution - Here
Terminology
The words Apps and Add-Ins can be a little confusing, Microsoft has officially renamed SharePoint Apps to SharePoint Add-Ins. In Visual Studio and SharePoint Online the dialogs still use the old term Apps.
Original name
|
New name
|
|---|---|
apps for SharePoint
|
SharePoint Add-ins
|
app part
|
add-in part
|
app web
|
add-in web
|
Instructions
This demonstration will be done using Visual Studio 2015 Update 3.
Open Visual Studio 2015 and Select File | New Project
Under the New Project | Installed | Templates |Office/SharePoint | Select App for SharePoint
Enter a SharePoint site where this application will be published
Select SharePoint Hosted and Select Next
Select SharePoint Online for the target version and Select Finish
Installing NuGet packages
Right click on the project name and Select Manage NuGet Packages. Select the Browse link and search for Bootstrap. Select Bootstrap from the list and choose version 3.7 in the dropdown. Select the Install Button.Repeat this process for the remaining Javascript libraries listed above.
Create the SharePoint Files List to host the data for the datatables grid
Right Click on the project name and select Add | New Item
Under the Office/SharePoint Items | Select List and type 'Files' as the name
Enter 'Files' for the name to display and Select Create a customizable list template and a list instance of it Radio Button. Select Finish
The Files | Schema.xml file should automatically open (if not simply double click on the Files List from the solution explorer. On the Columns tab, create columns for FileName, FileType and Team, each column will have a Type of Single Line of Text. Save and Close the Schema.xml File
Note: At any point you may be prompted to sign in to Office 365, enter your credentials and select Sign In
Populate Sample Data into Files List
Open the Elements.xml file beneath Files | FilesInstance. Delete everything in this file, copy and paste the following code into this file:
<?xml version="1.0" encoding="utf-8"?>
<Elements xmlns="http://schemas.microsoft.com/sharepoint/">
  <ListInstance Title="Files" OnQuickLaunch="TRUE" TemplateType="100" Url="Lists/Files" Description="Files List Instance">
    <Data>
      <Rows>
        <Row>
          <Field Name="Title">Autoexec</Field>
          <Field Name="FileName">Autoexec</Field>
          <Field Name="FileType">bat</Field>
          <Field Name="Team">Dell</Field>
        </Row>
        <Row>
          <Field Name="Title">Config</Field>
          <Field Name="FileName">Config</Field>
          <Field Name="FileType">sys</Field>
          <Field Name="Team">EMC</Field>
        </Row>
        <Row>
          <Field Name="Title">Hosts</Field>
          <Field Name="FileName">Hosts</Field>
          <Field Name="FileType">exe</Field>
          <Field Name="Team">Dell</Field>
        </Row>
        <Row>
          <Field Name="Title">Bootstrap</Field>
          <Field Name="FileName">Bootstrap</Field>
          <Field Name="FileType">js</Field>
          <Field Name="Team">EMC</Field>
        </Row>
        <Row>
          <Field Name="Title">Startup</Field>
          <Field Name="FileName">Startup</Field>
          <Field Name="FileType">css</Field>
          <Field Name="Team">Dell</Field>
        </Row>
      </Rows>
    </Data>
  </ListInstance>
</Elements>
Note: After saving the list and deploying to SharePoint I noticed that the filetype
column was displaying 'undefined'. I looked at the schema.xml file for the Files list
and noticed the filetype had been changed to filetype1 in the <fields><field></field></fields>
node. A simple search in this file for filetype helped identify 2 places where I needed to
change the name back to filetype. Not sure why this occurred.
Add Javascript to App.js file
The following javascript contains functions to populate the datatables grid, provide
All of the Create, Read, Update and Delete (CRUD) methods, creating the Bootstrap
model dialog for creating and editing files and delete file confirmation dialog.
'use strict'; var RestUrl = "../_api/lists/getbytitle('Files')/items"; $(document).ready(function () { PopulateGrid(); $('#fileFormSubmit').click(function (e) { //Check for edit or new and call update or add function if ($('#myModalLabel').html() == 'Add New File') { addFile($('#fileTitle').val(), $('#fileName').val(), $('#fileType').val(), $('#team').val()); } else { UpdateFiles($('#fileId').val()); } }); }); function PopulateGrid() { //Clear datatables $('#FilesGrid').empty(); //Get File list items $.ajax({ url: RestUrl, method: "GET", headers: { "accept": "application/json;odata=verbose" }, success: function (data) { if (data.d.results.length > 0) { //construct HTML Table from the JSON Data $('#FilesGrid').append(GenerateTableFromJson(data.d.results)); //Bind the HTML data with Jquery DataTable var oTable = $('#FilesTable').dataTable({ //control which datatable options available dom: 'Bfrltip', //add select functionality to datatable select: true, //adjust column widths "columns": [ null, null, null, null, null, { "width": "8%" } ], //remove sort icon from actions column "aoColumnDefs": [ { "bSortable": false, "aTargets": [5] } ] }); } else { $('#FilesGrid').append("<span>No Files Found.</span>"); } }, error: function (data) { $('#FilesGrid').append("<span>Error Retreiving Files. Error : " + JSON.stringify(data) + "</span>"); } }); }; //Generate html table values function GenerateTableFromJson(objArray) { var tableContent = '<table id="FilesTable" class="table table-striped table-bordered" cellspacing="0" width="100%">' + '<thead><tr>' + '<th>ID</th>' + '<th>Title</th>' + '<th>FileName</th>' + '<th>FileType</th>' + '<th>Team</th>' + '<th>Actions</th>' + '</tr></thead>'; for (var i = 0; i < objArray.length; i++) { tableContent += '<tr>'; tableContent += '<td>' + objArray[i].Id + '</td>'; tableContent += '<td>' + objArray[i].Title + '</td>'; tableContent += '<td>' + objArray[i].FileName + '</td>'; tableContent += '<td>' + objArray[i].FileType + '</td>'; tableContent += '<td>' + objArray[i].Team + '</td>'; tableContent += "<td><a id='" + objArray[i].Id + "' href='#' style='color: orange' class='confirmEditFileLink'>" + "<i class='glyphicon glyphicon-pencil' title='Edit File'></i></a>  "; tableContent += "<a id='" + objArray[i].Id + "' href='#' style='color: red' class='confirmDeleteFileLink'>" + "<i class='glyphicon glyphicon-remove' title='Delete File'></i></a>  "; tableContent += "<a id='" + objArray[i].Id + "' href='#' class='confirmListItemDetailsLink'>" + "<i class='glyphicon glyphicon-cog' title='Link to List Item'></i></a></td>"; tableContent += '</tr>'; } return tableContent; }; // Edit button click event $(document).on('click', '.confirmEditFileLink', function (e) { e.preventDefault(); var id = this.id; var requestUri = "../_api/web/lists/getByTitle('Files')/items(" + id + ")"; $.ajax({ url: requestUri, method: "GET", contentType: "application/json;odata=verbose", headers: { "accept": "application/json;odata=verbose" }, success: function (data) { $('#fileTitle').val(data.d.Title); $('#fileName').val(data.d.FileName); $('#fileType').val(data.d.FileType); $('#team').val(data.d.Team); $('#fileId').val(data.d.Id); $('#myModalLabel').html('Edit File'); $('#myModalNorm').modal('show'); $("#etag").val(data.d.__metadata.etag); } }); }); //Link to files list item $(document).on('click', '.confirmListItemDetailsLink', function (e) { e.preventDefault(); var id = this.id; var requestUri = "../Lists/Files/DispForm.aspx?ID=" + id; window.location.href = requestUri; }); // Delete button click event $(document).on('click', '.confirmDeleteFileLink', function (e) { e.preventDefault(); var id = this.id; BootstrapDialog.show({ size: BootstrapDialog.SIZE_SMALL, type: BootstrapDialog.TYPE_DANGER, title: "Delete Files Confirmation", message: "Are you sure you wish to Delete this File?", buttons: [ { label: "Confirm", cssClass: 'btn-primary', action: function (dialog) { dialog.close(); var restUrl = "../_api/web/lists/GetByTitle('Files')/items(" + id + ")"; jQuery.ajax({ url: restUrl, type: "DELETE", headers: { Accept: "application/json;odata=verbose", "X-RequestDigest": $("#__REQUESTDIGEST").val(), "IF-MATCH": "*" } }); toastr.success("File Successfully Deleted.", "Success"); PopulateGrid(); } }, { label: "Cancel", action: function (dialog) { dialog.close(); } } ] }); }); //Update Model Label function updateFormLabel() { $('#myModalLabel').html('Add New File'); }; //Populate then display model dialog for add file button clicked function addNewFile() { $('#myModalLabel').html('Add New File'); $('#fileTitle').val(''); $('#fileName').val(''); $('#fileType').val(''); $('#team').val(''); $('#fileId').val(''); $('#myModalNorm').modal('show'); }; //Edit file function function UpdateFiles(id) { var fileTitle = $("#fileTitle").val(); var fileName = $("#fileName").val(); var fileType = $("#fileType").val(); var team = $("#team").val(); var eTag = $("#etag").val(); var requestUri = "../_api/web/lists/getByTitle('Files')/items(" + id + ")"; var requestHeaders = { "accept": "application/json;odata=verbose", "X-HTTP-Method": "MERGE", "X-RequestDigest": $('#__REQUESTDIGEST').val(), "If-Match": eTag } var fileData = { __metadata: { "type": "SP.Data.FilesListItem" }, Title: fileTitle, FileName: fileName, FileType: fileType, Team: team }; var requestBody = JSON.stringify(fileData); return $.ajax({ url: requestUri, type: "POST", contentType: "application/json;odata=verbose", headers: requestHeaders, data: requestBody }); } //Add File function var addFile = function (fileTitle, fileName, fileType, team) { var requestUri = "../_api/web/lists/getByTitle('Files')/items"; var requestHeaders = { "accept": "application/json;odata=verbose", "content-type": "application/json;odata=verbose", "X-RequestDigest": $('#__REQUESTDIGEST').val() } var fileData = { __metadata: { "type": "SP.Data.FilesListItem" }, Title: fileTitle, FileName: fileName, FileType: fileType, Team: team }; var requestBody = JSON.stringify(fileData); return $.ajax({ url: requestUri, type: "POST", headers: requestHeaders, data: requestBody }); };
Modify the Default.aspx page with the following code
In the <asp:content> section all of the css and script references are added, ensure these match the
file locations from the downloaded NuGet packages, if they don't they will be underlined indicating
there is an issue.
<%-- The following 4 lines are ASP.NET directives needed when using SharePoint components --%> <%@ Page Inherits="Microsoft.SharePoint.WebPartPages.WebPartPage, Microsoft.SharePoint, Version=15.0.0.0, Culture=neutral, PublicKeyToken=71e9bce111e9429c" MasterPageFile="~masterurl/default.master" Language="C#" %> <%@ Register TagPrefix="Utilities" Namespace="Microsoft.SharePoint.Utilities" Assembly="Microsoft.SharePoint, Version=15.0.0.0, Culture=neutral, PublicKeyToken=71e9bce111e9429c" %> <%@ Register TagPrefix="WebPartPages" Namespace="Microsoft.SharePoint.WebPartPages" Assembly="Microsoft.SharePoint, Version=15.0.0.0, Culture=neutral, PublicKeyToken=71e9bce111e9429c" %> <%@ Register TagPrefix="SharePoint" Namespace="Microsoft.SharePoint.WebControls" Assembly="Microsoft.SharePoint, Version=15.0.0.0, Culture=neutral, PublicKeyToken=71e9bce111e9429c" %> <%-- The markup and script in the following Content element will be placed in the <head> of the page --%> <asp:Content ContentPlaceHolderID="PlaceHolderAdditionalPageHead" runat="server"> <!-- CSS styles added to the following file --> <link type="text/css" href="../Content/App.css" rel="Stylesheet"/> <link type="text/css" href="../Content/toastr.css" rel="stylesheet" /> <link type="text/css" href="../Content/bootstrap.css" rel="stylesheet" /> <link type="text/css" href="../Content/bootstrap-dialog.css" rel="stylesheet" /> <link type="text/css" href="../Content/DataTables/css/select.bootstrap.min.css" rel="stylesheet" /> <link type="text/css" rel="stylesheet" href="https://cdn.datatables.net/1.10.8/css/jquery.dataTables.css"> <!-- javascript references added to the following file --> <script type="text/javascript" src="../Scripts/jquery-1.9.1.min.js"></script> <script type="text/javascript" src="../Scripts/bootstrap.js"></script> <script type="text/javascript" src="../Scripts/bootstrap-dialog.js"></script> <script type="text/javascript" src="../Scripts/toastr.min.js"></script> <script type="text/javascript" src="../Scripts/App.js"></script> <script type="text/javascript" src="https://cdn.datatables.net/1.10.8/js/jquery.dataTables.min.js"></script> <script type="text/javascript" src="../Scripts/DataTables/dataTables.select.min.js"></script> </asp:Content> <%-- The markup and script in the following Content element will be placed in the <body> of the page --%> <asp:Content ContentPlaceHolderID="PlaceHolderMain" runat="server"> <div class="container"> <h1><span class="label label-primary">Grid Data Consumed via SharePoint Rest API</span></h1> <div id="toolbar"> <button type="button" value="Files" class="btn btn-info" onclick="Javascript: location.href = '../Lists/Files'"><span class='glyphicon glyphicon-upload'></span> File List</button> <button type="button" class="btn btn-success" onclick='addNewFile();'><span class='glyphicon glyphicon-plus'></span> Add New File</button> </div> <p></p> <div id="FilesPanel"> <table style="width: 100%;"> <tr> <td> <div id="FilesGrid" style="width: 100%"></div> </td> </tr> </table> </div> <!-- Bootstrap Modal Dialog--> <div class="modal fade" id="myModalNorm" tabindex="-1" role="dialog" aria-labelledby="myModalLabel" aria-hidden="true"> <div class="modal-dialog"> <div class="modal-content"> <!-- Modal Header --> <div class="modal-header"> <button type="button" class="close" data-dismiss="modal"> <span aria-hidden="true">×</span> <span class="sr-only">Close</span> </button> <h4 class="modal-title" id="myModalLabel"> Add New File </h4> </div> <!-- Modal Body --> <div class="modal-body" id="modalBody"> <form role="form" id="fileForm"> <div class="form-group"> <label>File Title</label> <input class="form-control" id="fileTitle"/> </div> <div class="form-group"> <label>File Name</label> <input class="form-control" id="fileName"/> </div> <div class="form-group"> <label>File Type</label> <input class="form-control" id="fileType"/> </div> <div class="form-group"> <label>Team</label> <input class="form-control" id="team"/> </div> <!-- hidden controls --> <div style="display: none"> <input id="etag" /> <input id="fileId" /> </div> </form> <div class="modal-footer"> <button type="button" class="btn btn-danger" data-dismiss="modal" onclick='updateFormLabel();'> Cancel </button> <button type="submit" class="btn btn-primary" id="fileFormSubmit"> Submit </button> </div> </div> </div> </div> </div> </div> </asp:Content>Verify Solution - a list of items in the Visual Studio SolutionDeploy SharePoint Add-In to SharePoint Online
Right click on the project name and Select Deploy
In the Output Tab ensure that the SharePoint Add-in deploys successfully. During deployment there will be a message: Installation is in progress (00:00:00) with a timer to show the amount of time it takes for deployment.
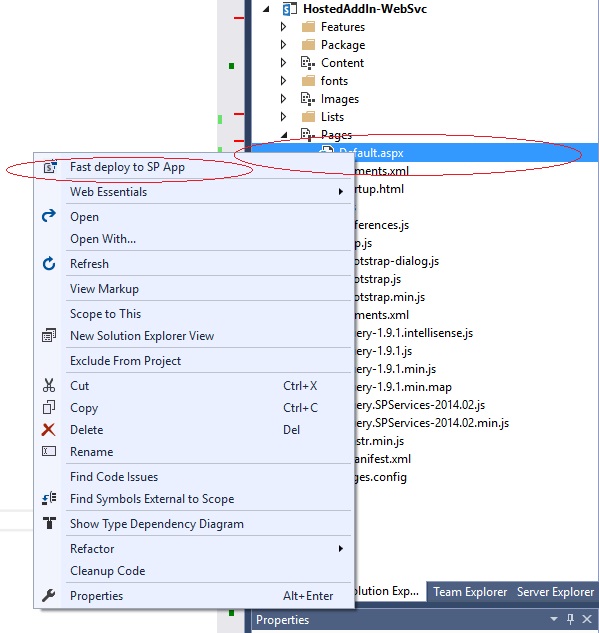
Note: If you have installed and configured SPFastDeploy you will no longer have to wait for this lengthy deployment process after the initial deployment. If you make a simple change to a single file you can just right click on the file and select SPFastDeploy.
View the SharePoint Add-In in SharePoint Online
Navigate to the SharePoint site configured in your SharePoint Add-In properties
Select the ResponsiveSharePointHostedAddin link from the left navigation
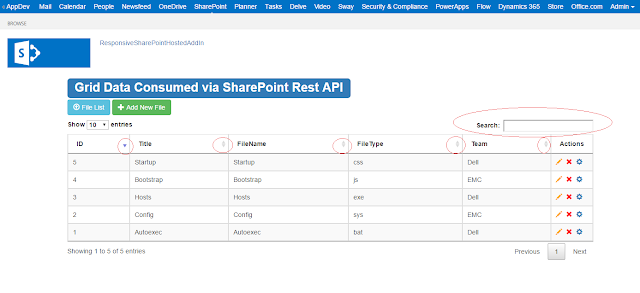
Note: In the action column if you hover over the icons you will see a description for each icon, from left to right there is edit, delete and link to list item icons. Bootstrap is used here to render these icons using a regular <a href> tag with a class='glyphicon glyphicon-pencil' for the edit icon for example.
Testing SharePoint Add-In Functionality
Select the Add New File Button, this will present the Bootstrap Model Dialog prompting the user to create a new file. Select Cancel.
Select the Pencil icon from one of the items in the grid. Notice the row selected changes colors (JQuery.Datatables.Select library) indicating this row is selected and then Bootstrap dialog opens allowing the user to edit the selected file. Select Cancel.
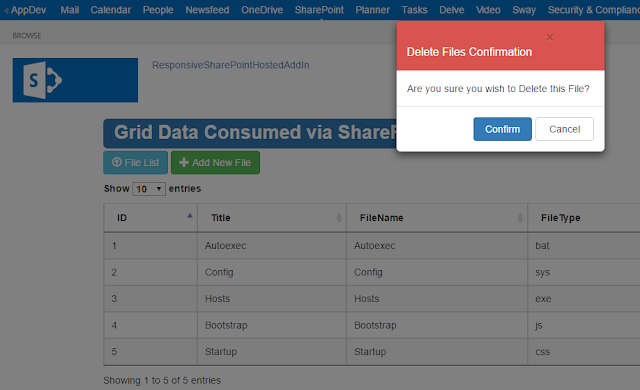
Select the Delete icon from one of the items in the grid. A Bootstap dialog will be displayed asking for confirmation of the file deletion. Select Cancel.
Select the order by column headers for some of the columns in the grid, notice how there are no post-backs for any of this functionality and its very fast. Type something in the search box that appears in the grid, notice how it quickly filters items to the text you type again with no post-backs.
Select Delete on an item in the grid, confirm the deletion. A Toast will fire indicating the file was successfully deleted.
This completes this demonstration.
Download Visual Studio Solution - Here


